#blender shader tutorial
Explore tagged Tumblr posts
Visit Tumblr Blog
Explore Tumblr blogs with no restrictions, modern design and the best experience.
Last Seen Tumblr Blogs


Fun Fact
Premium Tumblr themes are available from anywhere between $9 to $49.
Text
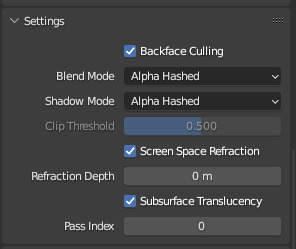
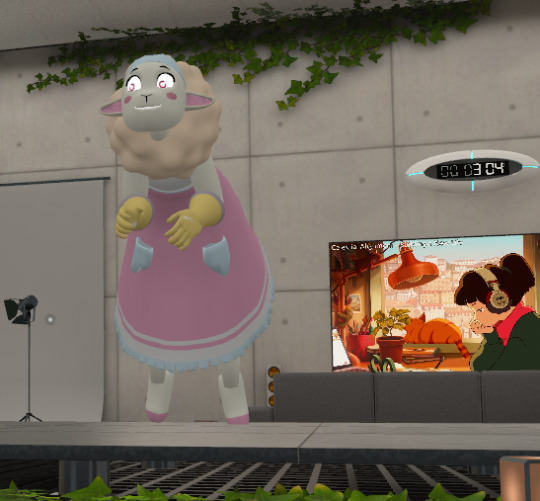
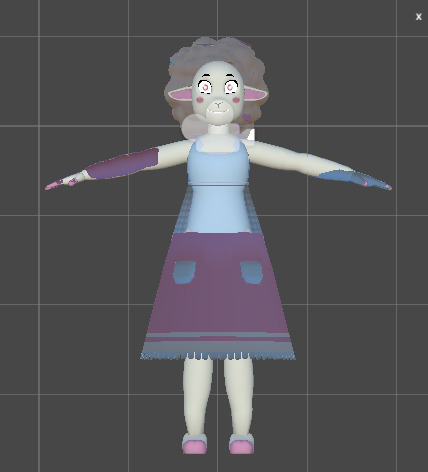
OKAY, SO I FIGURED IT OUT, tutorial under the cut!
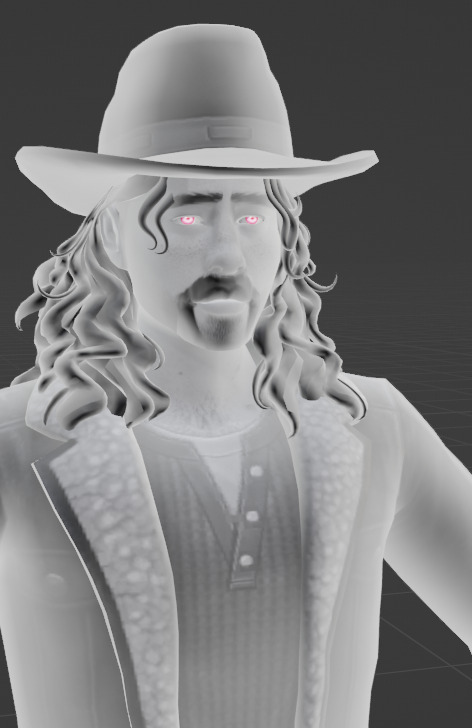
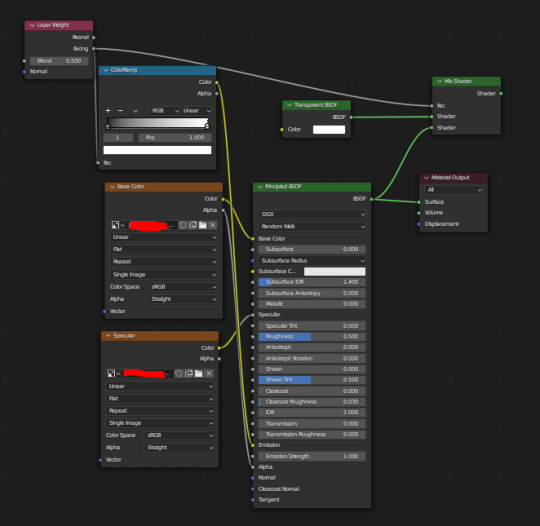
So this was DIFFICULT to figure out, because I'm stupid, and I scoured the internet for tutorials, and I found one that worked for me!
Blender Tutorial - Ghost material
But it needed some fine-tuning to work, so here's the way my nodes are set up
PINK EYES NOT INCLUDED, the eyes were separated and a different shader was applied to make them glow
OH and don't forget to set transparency in your material settings!
Also make sure your diffuse texture is black and white, go into your art application of choice (Photoshop, Sai, Gimp, Clip studio etc) and just turn the saturation all the way down to make it look exactly like mine!
Good luck everyone!
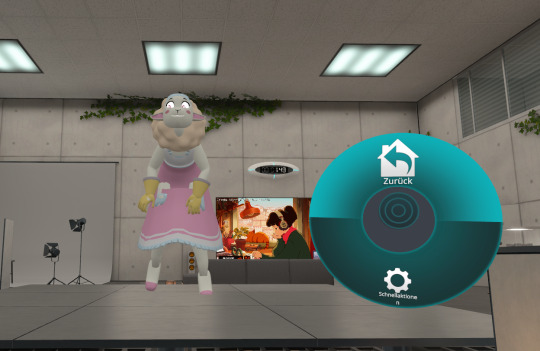
Blender help!
Does anybody know how to make your ripped sims in Blender have that same sort of shading ghosts do in the game? I tried making one myself, but the eyes were entirely visible in the head and I didn't like that
#TS4 render#sims 4 render#blender render#sims render#Sims 4#TS4#The sims 4#simblr#ts4 simblr#sims 4 simblr#ts4 tutorial#thesims4#the sims#tutorial#the sims 4 tutorial#sims 4 blender tutorial#ts4 blender tutorial#blender tutorial#sims 4#ts4#mine#the sims 4#blender#shaders#shader tutorial#blender shader tutorial
4 notes
·
View notes
Text
new voronoi texture scattering method just dropped :3
youtube
(ok the video didnt embed the first time dang)
7 notes
·
View notes
Text
blender tutorials are in another realm time-wise. its so easy to find a 10 minute video and go 'oh let's try this it'll be quick' and then you start and come out of it an hour later with a simple reference file with a colorful cube inside and a million more things to learn/memorize.
#shush alice#blender woes#for reference i was following a shader tutorial and taking notes on all the steps taken which is probably what added a good 30m or so#but its worth it because now i have 1. a completed reference file to plug into others later and 2. a list of what to do for future shaders#just trying to learn its and pieces of this program so i have plenty of reference/resources for future projects#since i dont have anything i want/need to use it for atm
5 notes
·
View notes
Text
youtube
How to create a realistic water in blender 4
Also free shader and material in description
#art#artists on tumblr#youtube#3d artwork#blender#3drender#design#3d model#gaming#tutorial#blender4#blender art#material#manipulation#shader#waterfall
1 note
·
View note
Text
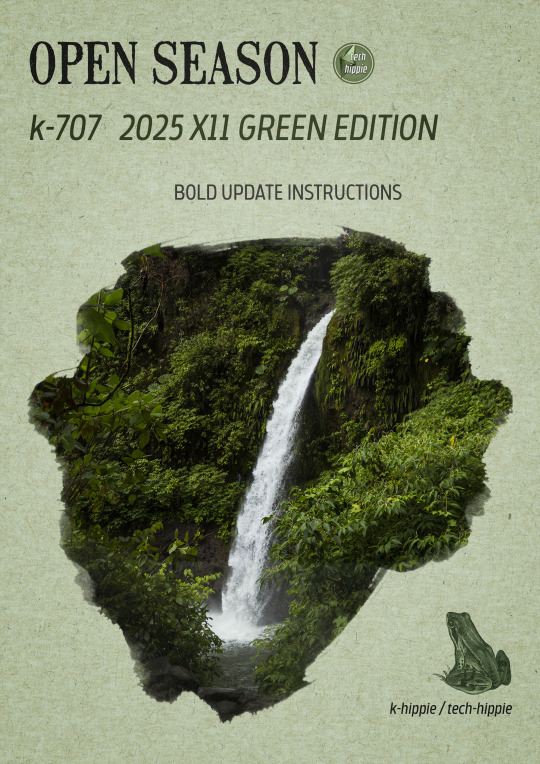
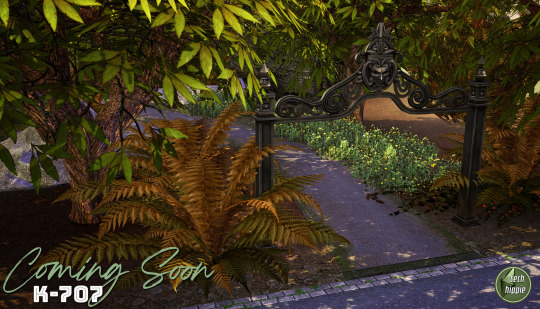
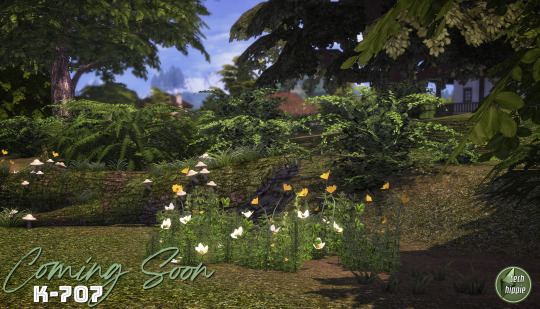
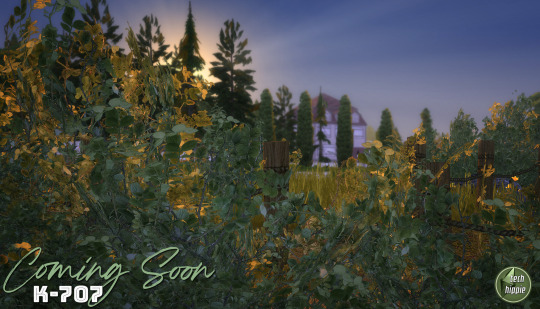
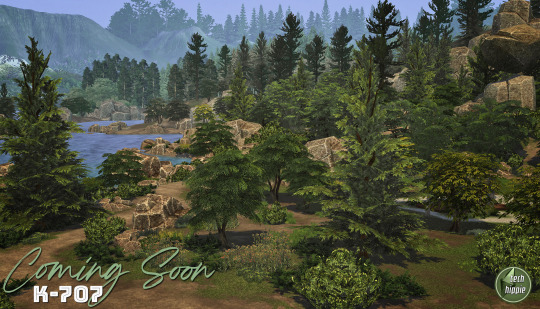
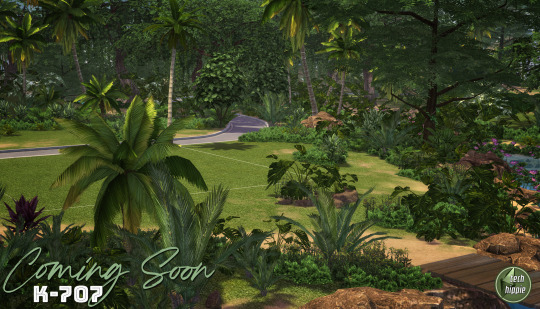
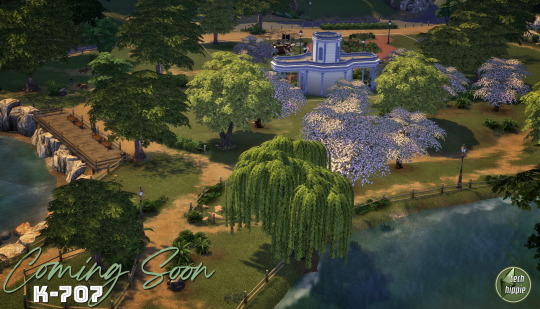
k-707 2025 BOLD UPDATE INSTRUCTIONS
Hello everyone :)
The new k-707 is going to be released in the coming days :D but as it is a kind of new experience, we have some kinda instructions in order to get everything working fine.
Step right up, folks, for the grand unveiling of our biggest project yet! The K-707 isn’t just a mod—it’s a green revolution. Taking on almost every flower, patch of grass, bush, and tree makes this even more massive than the K-505. And trust us, our brains are already feeling the strain! :D
But before instructions, let me tell you the k-707 story ;)
We really hope you'll enjoy it. We worked hard on it with 5 rules :
Replace EVERY tree of the game
NO overrides with crazy high polygons amount
Follow as much as possible the Maxis directions ( trees style )
Decrease amount of polygons where it is possible
No trees defying gravity and laws of physics
It took long for few reasons ...
At first, we always knew the first version was a vast experiment. When ea made its direct x11 update, it was time to make a bold update ... but we didn't want simply remove the non-strictly-dds-x2 images and replace them ... we wanted more. We always wanted more, even we are not kinda ea gurus :D ( hey EA ! don't you want hire some true creators with a long term vision of your game ? ) <- poll : would you like k-hippie as maxis creators or not ? :D
Joke apart, it was difficult. Almost 1 year long, we searched and searched solutions to get rid of all problems we met when replacing foliage on a debug tree, or modifying anything on a debug tree ( for info : we are not blender gurus nor sims 4 core users )
All we knew was few lines :
When cloning a tree, you cannot lose the any of the vert color data. I suspect whatever tool(s) you are using to do the cloning is losing this data, since this setup is somewhat unique to trees.
The vertex color layout for trees is as follows. Green and Blue are ignored for channels 1…4 : Color 0 RGB Surface color tint Color 1 R Rustle direction X Color 2 R Rustle direction Y Color 3 R Rustle direction Z Color 4 R Rustle phase ( game generates two wind scales that change over time, this term interpolates between the two )
The pipeline keeps the rustle information in a vertex color format for what the game engine will load, which means it’s in the range 0 and 1. The shader remaps this into a 0.5 to -0.5 range before scaling it and applying the offset to the leaves. Note that these directions are clamped but not normalized ( they’re allowed to be different lengths ) The WindMagnitude material parameter acts as a scaling factor.
So, we started with this information, begging in vain for some help, both inside the Sims community and outside ... but nobody helped us. And frankly, it interested no-one except us and our beloved followers :)
We found multitude of tutorials ( funny how many they are as soon as it is clothes related ) but nothing related to our specific target. We paused our research many times, made direct x11 updates for our other k-mods and so on. Until ... zaceitorius in July 13rd 2024
Who is zaceitorius ? We do not know. A simple member of sims4studio with 6 posts who gave us a simple bright clue which seems obvious after all, but yet very very precious indeed !
And here we are today. 300 trees and numerous plants later ... <- another reason why it took a long time :D
We made a lot of vertex experiments, we lost data colors, remade again and again some other experiments and well, we are still experiment, remake small details which seem important to us and so on ... And for now, it works :D And now you are warned : the k-707 is far from perfect.
And now, the instructions :)
The k-707 covers both trees & plants, both debug and lot trees & plants
What's new ? No more than usual. We tracked all the non-strictly-dds-x2 images, reshaped some trees ( such as the multitude of oaks ), added some flowers ( where we removed them in 2021 ) but kept many foliage we already did. We tried to simplify many details but added some others and replaced some plants.
How many stuff it represents ? We do not know. Many indeed. We stopped the count :D
Because of its size ( and our love for our sanity ), THE RELEASE WILL ROLL OUT IN PARTS ( not slowly but piece by piece ). If we waited until it was all perfect, you’d be seeing it around ( maybe ) September 2025 ... Let’s not tempt fate—or burnout! :D
The K-707 is neatly organized for your convenience :
Each DLC gets 2 folders : one for plants, one for trees.
The base game gets 4 folders ( a bit different since most of the greenery is drawn from there ) divided into lots and debug folders.
Expansions which have very few greenies ( City, Get to Work, University ) get the same folder named : k-hippie-k707-multi-greeny-2025
IMPORTANT :
Leave them in each of their folders ( or create your owns based on a similar methodology )
If you merge files : we can’t help troubleshoot if it doesn’t work anymore, so be smart ;)
You’re free to do as you like, but we strongly recommend keeping this tidy folder setup. If you need to troubleshoot down the line, it’ll save you a major headache.
And for the mavericks out there who love merging files—go for it, but know this : we won’t be able to help if things go haywire.
Now, we could wax poetic about how stunning the K-707 is, how every leaf, petal, and blade of grass is crisper, richer, and beautifully integrated into your worlds—but hey, we'll do it later, inside the release post :D
We could do more, more realistic trees and so on but we do not want integrate crazy high poly models. We do not want an unplayable game isn't it ? ;)
The k-707 is not yet finished. We got some more work to do on it, shape the last details, and some re-checks.
But here is what is new compare to the previous version : we kinda cracked ( a bit only ) the code. Trees swinging in the wind like it’s a dancing contest ? No more. Trees defying gravity and laws of physics by groveling into the ground ? No more. Just remember we do not have the hands upon the worlds construction, so, when trees are not into the ground, well, call your reseller aka EA itself ...
#sims 4 custom content#sims 4#sims 4 wysiwyg#sims 4 cc#k-hippie talk#ts4#the sims 4#k-hippie#k-mods#k-707#k hippie#k-505#sims 4 green#sims 4 expansions#sims 4 base game#sims 4 trees#sims 4 plants#ts4 overrides#sims 4 overrides
360 notes
·
View notes
Text
How to convert Sims 4 3D CAS Rooms to Sims 3

Disclaimer: If you’re not familiar with Blender/TSRW/UVs then this tutorial may not be for you. If you don’t have Sims 4 Studio which needs the Sims 4 base game (or don’t know how to extract the meshes without it) this tutorial may not be for you. Honestly it’s pretty straight forward, but there’s a lot of trial and error and going in game and out of game checking placement, etc. I use Blender 4.1 for this, but you should still be able to do the same things in the older versions. I'm trying to make this as easy as possible. I’m here to answer any questions though 💕 Tutorial below
Things you’ll need:
Blender (whatever version you prefer)
Sims 4 Studio
TSRW ( I use version 2.0.86)
My Christmas CAS Room here
My TSRW work file here
Tutorial:
Find a Sims 4 CAS room that you like and open it up in Sims4Studio. This is the one I'll be using for the tutorial.

In the Texture tab, export the textures. The only textures that matter are the first 3 diffuse. Go to the Meshes tab and export the mesh, it will save as a .blend file. After that you can close out of Sims4Studio.


Open my Christmas CAS Room in TSRW. You'll get this message. Hit ignore and don't send. We only need this file as a reference to resize the SIms 4 CAS room. Export the mesh as an obj, name it whatever you like. You can close TSRW for now.

Open Blender and open the .blend file you exported from Sims4Studio. Make sure to delete studio_mesh_0 as it's just the shadow map and we don't need that. This is what mine looks like after fixing the textures.

Then import the wavefront obj you just exported from TSRW. Again we're just using this as a size reference.
This is what it looks like after I added the obj. I scaled, moved, and rotated the room to match up as close as I could with my reference mesh. When you have it lined up to your liking you can delete the reference mesh. I usually import the sims 3 body to see where my sim would be in CAS as well so feel free to do that too.

Now we have to separate the objects that use transparency in the scene to their own group. The transparent objects will always be located on studio_mesh_1. I usually do this in UV mode. Make sure UV Sync Selection is on. Where the red arrow is, that's the UV Selection button. It's blue so that means its on.

Tip: If you're using the same Blender version I am (I'm not sure if the older versions below Blender 3.0 do this) you can disconnect the alpha in shader editor and then you can easily see what uses transparency because it has a black background like the plants. Don't worry about the one outside the window as that's on the backdrop image and doesn't show in CAS.
Important: Also, make sure you delete the back of the mirror frame or it will show through the mirror in game. I usually select it in the UV editor as well and delete it.

After selecting all the objects that use transparency, I go to the 3D viewport window and press P, then selection. Now they're on their own layer as you can see. That's a very important step so please don't miss it.

Sims 4 CAS Rooms don't have a closed room like ts3 and if you don't add walls/ceiling with planes you'll be able to see that it in CAS. You can do this in any way you're comfortable with. If you don't understand how to do it feel free to ask me. For this tutorial I will not be doing this perfectly lol I've done enough rooms and I'm just trying to teach here 😩

Okay now last is renaming groups to import into TSRW. Make sure it's in this exact order and uses the exact group numbers.
Group 0 - Mirror
Group 1 - Windows/Curtains
Group 2 - View outside the window
Group 3 - Walls
Group 4 - Objects with transparency
Depending on the CAS Room you convert, yours may not have a mirror you know. You can delete groups in TSRW, experiment, feel free to ask me questions as well.
After renaming the groups, select only the groups you renamed and export as an obj. Make sure that object groups is checked so that they can stay in groups.

Open TSRW and open the testroom_cas.wrk file.
After opening the file you'll see this exact room in this tutorial lol because I had to test some things first 😅

Import the CAS room you converted from ts4. You'll get these two messages. Click yes on the first and no on the second.
Disclaimer: Make sure you reduce polygon sizes or it won't import and give you an error


Import your textures (yours may be different than mine depends on the converter) but most have been the same that I've seen. Group 0 is the mirror it doesn't require a texture. Group 1 and Group 4 usually have the same texture.
Disclaimer: TSRW an be finnicky with textures sizes, I havent gotten any issues since using the 4GB patch, but just in case. Texture sizes from ts4 can run pretty big 4096x2048 even 8196x4096. I would resize to no bigger than 2048x1024 in my opinion, but whatever works for you.
After export to sims3pack or export as package file. Make sure you compress your files and you should be good to test your CAS room in game.

This is the finished product. Should look something like this or better lol considering this was quick 😅
If you would like to make your own from the original ts3 cas room, I would suggest watching this Youtube video (it's for TS4 but it still applies and is helpful) and the link to the original ts3 cas room is here. Since we can convert ts4 to ours you could probably just build your own and go from there as well.
Thanks to @mookymilksims for testing things for me and converting her own. If you would like to try this tutorial out and experiment with room placements using @boringbones Ultra wide CAS mod which changes the field of view in cas so that you can see the whole cas room, it is here. I didn't use it for mine, but that's only because I found out about it after from Mooky lol and I'm tired of converting them 😅 but feel free to ask me any questions if you need help 😊
#ts3#tutorial#sims3#I hope this helped#been procrastinating finishing this 🙃#cas room tutorial#sorry if it's long#tried to be thorough and make sure everything was correct#my tutorials
172 notes
·
View notes
Text


track 02: check pattern
perhaps we are walking on many lines that are crossing one another meeting you was the coincidences crossing over if i think that was all maybe the breakup will be bearable ... maybe it's because we embody different colors so that we couldn't approach each other

track 03: i don't wanna do anything
over nothing at all i'm getting sensitive again piling up dust-like worries one by one ... right now, looking through the rain-streaked window i feel like i'm watching something everything's blurry and out of focus things that won't change

track 06: wednesday night
every wednesday night for some reason, my heart flutters even the stuffy weather and the congested roads i feel like i can forgive it all ... every time, i greet you with a smile and say, “hello” then, “thank you for making time for me” when we part, i say, “sleep well and don’t even dream” hope to be with you on every wednesday night
author's rambling
initial notes
i had my work cut out for me with this one—it’s on a completely different scale and style from my april entry. brunch club had 1 big render and 5 smaller edits with pics taken in cas; this project had a minimum of 3 big renders, with an undetermined amount of extra stuff. this time, instead of creating characters and developing lore for them, i wanted to create scenes that conveyed the emotions i feel when listening to the song, and the visions i imagine while reading the lyrics. i’m much more skilled with blender after almost 2 months worth of practical experience, so at least i didn’t have to learn an entirely new program. i didn’t even have to make renders for this, i just wanted to do it because they’re fun and i like the creative freedom i get with rendering vs taking in-game pics.
album - 30
this album really spoke to me because while it may not be the most groundbreaking work of art, it definitely holds significant meaning, especially to sungjin himself. it comes with the added bonus of two of the songs being right up my alley in terms of music taste—so much that it’s almost unnerving. it’s like that guy lives in my brain
there is something about this album that just goes so well with public transportation, and that's where the inspiration for my edits came from! you can take a peek at my moodboard here
check pattern
this one i had a pretty clear vision once i read the lyrics. it’s a song about going your separate ways after a breakup, and i immediately thought of an elevator scene (i also thumbnailed an escalator scene, but that was scrapped early on). i made a render and did all the editing for it, but i wasn't sure if i really liked or not, and then i ended up making a completely new render using the subway scene
i do think that as far as the meaning of the song goes, my original edit fits better, but overall as a set i like this one more
yes, i know, it parallels the shining twins. no, that was not my intention but what the hell, sure
did i sneak chuuves in here? yeah #ILoveLesbians
i don't wanna do anything
this actually the first edit i finished for this entry, and i liked it so much that i ended up using the same scene and overlays on the other two for #Continuity
the original idea was a snapshot from outside a city bus at night, with the silohuette of someone inside the bus behind a foggy, rain-streaked window. i was doing pretty alright when it came to building the scene and so forth, but i hit a dead end when i got to the window bit. there's a line in the lyric that goes 'right now, looking through the rain-streaked window', and so getting the rain on the window would be a crucial part of the render. at first i had planned to download someone else's shader and slap it on my window object, but the ones i found for free either weren't compatible with the blender versions i was working with or they simply were not cooperating with me. i didn't have the time to go through all the troubleshooting, so instead i watched a tutorial on how to make my own… which ended up being incredibly complicated and it probably would have taken me at least 3-4 hours if i had tried making my own shader. then i decided to just add the rain and fog during postprocessing, so i hit that render button and got to editing. but i wasn't feeling how that turned out either
i decided to go with a subway scene instead, and it turned out really well! i'm quite happy with the results on this one
wednesday night
this one sent me through the wringer and back. i went through so many thumbnails and drafts, but nothing was really hitting
about a week before the deadline, i had the genius idea to make mitsuaya-inspired sims for it. if i did it with chuuves, who's to say i can't pop some green yuri in there!
originally, i had in mind mitsuki offering her hand in escort to aya as she departed a bus, but trying to find pose references drove me up a wall. then i tried to make the poses without a reference, but i just could not get mitsuki to look natural. aya's poses were easy, but mitsuki always looked so stiff and i couldn't figure out how to make her relaxed without sacrificing posture and so forth. then i had the idea to make ALL of the renders using the subway scene, and i ended up with the two of them sitting down and leaning against each other
the sims themselves posed a whole other problem. aya, once again, was fairly easy to make and dress up in cas, but i went through four (4) different iterations of mitsuki and her outfits before settling upon the final one you see in the edit. i wanted to stay true to their canonic fashion taste, and mitsuki has a very androgynous/masc grunge-y punk-ish streetwear wardrobe. i tried referencing official art, but the pieces i had didn't quite fit the bill and i did not have the time to go cc hunting. in the end, i had to compromise and go slightly off canon (mitsuki has not and never will wear a cropped top or jacket), but i'm pretty satisfied with how she turned out!
the scene… oh boy. i tried extracting assets from in-game and cc, but the textures were off (i.e. there was a big ass american flag on the side of the bus and it's the only swatch but i'm not really rocking with patriotism like that) and i'm not quite there with my texturing skills yet, so trying to make a recolor was out of the question. then i tried using non-sims blender assets and 3d models, but trying to find decent quality models for free online is like searching for a pin needle in a haystack. and then i tried building my own scene completely from scratch—which means making brand new meshes and objects. the meshing went pretty okay, but trying to add materials and textures gave me a headache so that was a no-go as well. but once i decided to pivot to using the subway scene instead, things went rather smoothly! by that point, i had worked with that specific scene over ten times (mostly scrapped drafts), so cleaning it up was quite easy, and making poses and adding lighting were a breeze.
misc notes
what's club30, you ask? uhhhhhhh lesbian gay bar
i actually planned for a 4th render, but i ended up having to scrap it due to time constraints
my fave songs off the album are i don't wanna do anything and wednesday night! i love them so much yall i'm probably in the top 0.05% listener percentile or whatever the fuck it is
i was really close to redoing my first render so the models would be nanahachi instead, but alas… deadlines are a thing
@peachibunnii's server hosts monthly challenges, and this is for the may prompt! i'm also a mod over there! come and say hi :)
i'll be posting some behind the scenes wip pictures n things like that over on my patreon! you can find them here :)
thanks and credits: @peachibunnii and the bunniis for the prompt and encouragement; @salemssimblr and the crypt for their help and support; @vyxated for the life-saving ea rigplus; alex murias for the amazing scene i used in all of the renders; all the creators whose cc i used to make my sims: @jino-sims @seoulsoul-sims @jius-sims @charonlee @serenity-cc @caio-cc @sentate @hezeh @pralinesims @asansan3; blender, clip studio paint 4.0, sims 4 studio, and inkscape (the programs i primarily used); and last but not least, my emotional support brother from another mother beerkyeg. i'm definitely missing some people, but know that i love and appreciate you all! <3
78 notes
·
View notes
Text


So I wanted to make a 3D model of my recent hoppip art and it kinda got out of hand lol this was rly fun to play around with Blender's toon shaders and get the 2D look I wanted!!
Big huge shoutouts to Lightning Boy Studio's Blender toon shader tutorial and to Xetirano's Blender Parralax Shader tutorial . They are both amazing and taught me a lot, please check them out!!!
#b3d#sugar makes art#hoppip#pokemon#3d art#sugar does 3D#the big eye version was a happy accident#i wanna make more things that look like this neyehehhee
1K notes
·
View notes
Text


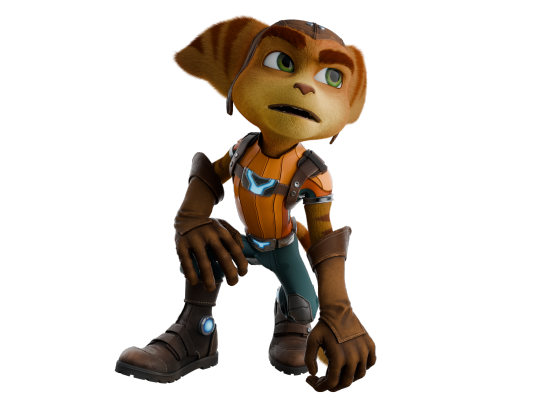
Newly finished character drop... this time, heccin
RATCHET!
Like Clank and Kit, he's also a game file yoink from Rift Apart. Base model and textures. Material work and fur were all hand made by me though.
And man, what a learning experience doing a fur system was. Gonna be talking about it in the post. Sharing some knowledge and a really helpful YouTube tutorial video. Click the spoiler to see all that.
If not, enjoy the poses above! He's all done!
And yes... #2 is exactly what you think it is. LOL.
The process of fur-ing my Ratchet model actually started back in January. Crazy i was crazy once. Below is my first attempt ever. Whoof. Haha. I had never done such a thing before, it was all new territory. Combing the hair, getting the density right. Getting the heccin MATERIALS to be right. So much to keep track of.
And to top it all off, many tutorials were outdated. Blender Geo-Nodes, what's responsible for the hair systems, keep changing over time. So even kinda new tutorials were outdated.

Combined with Rivet, who's gonna be coming soon, I probably redid their fur systems a combined dozens of times. Each time though it was worth it, because it got better and better. Each new time I learned more and more.
Material work was actually probably the trickiest. I eventually settled on a Cycles Toon Shader node setup and dumped the Principled Hair BSDF node. It gave better results that were truer to the game.
Basically, lots of trial and error. If anyone is going into this in a similar spot (never trying it before) expect your first fur system to suck. Keep trying, because you will eventually get it. It just takes practice and maybe a few tutorials haha.
Also, here's the tutorial I used that was finally able to get me jump started on making decent looking fur systems https://www.youtube.com/watch?v=csXjfrJ0DIY
That's it for now! He's all done, rigged, fur-ed, and everything in between. Can't wait to make some awesome scenes with him, Clank, Rivet, and anything else.
You've read this far, here's the neutral poses too! Gif was too large to upload, :(((


#blender#bluecolty's art#b3d#3d art#3d model#games#ratchet & clank#ratchet and clank#video games#ratchet#insomniac#insomniac games#playstation#rift apart#ps5
40 notes
·
View notes
Text
Ok I give up for now with the VRchat model.
By tomorrow I will have so much work that will keep me busy for a few months and can't work on the model until then.
This weekend I've redone the model in Uity 65 times, deleted, changed something in Blender, and repeat.
Here are the issues... (I use the Avatar test room on VRChat to show)


The view position. On Unity it's right in her head but on VRchat it's on the floor under her dress.
2) Crouching and crawling are looking strange like she is pretending to be a T-Rex.
3) And her legs go through the dress even though I did weight-paint everything and looked good on Blender.
4) I used VRCFury so the character could change hair and clothes on VRchat and they are nowhere to be found.
5) Her feet go through the floor while walking, but the feet are normal in Unity.

6)Different outfits and hairstyles are weirdly shaded or colored. PJ, Work dress, loose hair, and hair with cloth are fine. They all have the same material and the same shader settings: poiyomi toon, shade: realistic (only the eyes are unlit texture). But it still looks grey-ish/dark.
7)Some clothes and hairstyles are see-through In Blender the normals are flipped right but in Unity they are still see-through.
8) I can't get the right animation for her dress movement like it should be.
The ONLY things that work right: hair and ears wiggle and the eyes move. 😑
I am no expert and this is my very first VR model, I got so far with tutorials and the big help from @rubydevilcat-blog (Again, thank you so much!)
If anyone has advice or can help, let me know, please! I make a list for the next time I'm working on them.
(And to the people who asked me to do 3d/VR Model commissions, sorry but no!)
85 notes
·
View notes
Text

Made a pretty blender shader AND I made a tutorial for it :D
youtube
105 notes
·
View notes
Note
hey there! I've been working in blender for a while now but I'm really enthralled by how clean and kinda cel shaded your textures look would it be alright to ask what your general shader setup looks like or how you achieve that? thanks!
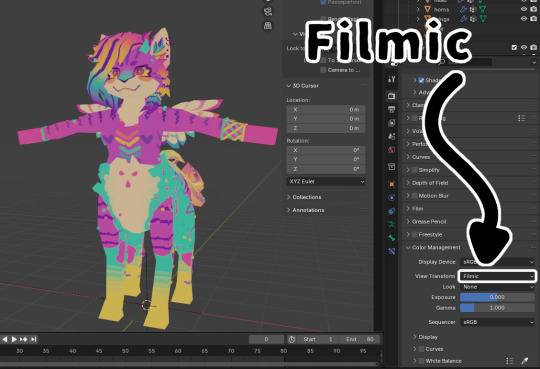
Thank you for asking! My shader setup is pretty simple, I just use an emission shader or just plug the image straight into the output haha if there're any shadows on my models it's usually painted in by hand I think the biggest thing that helps my shader look so nice is that I change my color management settings from filmic to standard

Other than that I have used the default principled BSDF shader a few times with one of the default "studio lights" or HDRIs as the world lighting
Here's a tutorial on how to set up the HDRIs to be rendered if you're interested
youtube
71 notes
·
View notes
Note
Do you have a tutorial of where you convert objects after and make them function?
Hi! Yes and no, LOL. 😅
☽✶•.¸(✶•.¸★¸.•✶´)¸.•✶´☾ ☆«´¨`•°°•´¨`»☆ ☽.¸.•✶(¸.•✶´★`✶•.¸)`✶•.☾
Welcome to Murf’s School of Crap and Crap-Making!
School Motto: Prepare to be tortured! For Science!
Lesson #28: FUNCTIONALITY (I love the way you move~! 🎶)
☽✶•.¸(✶•.¸★¸.•✶´)¸.•✶´☾ ☆«´¨`•°°•´¨`»☆ ☽.¸.•✶(¸.•✶´★`✶•.¸)`✶•.☾
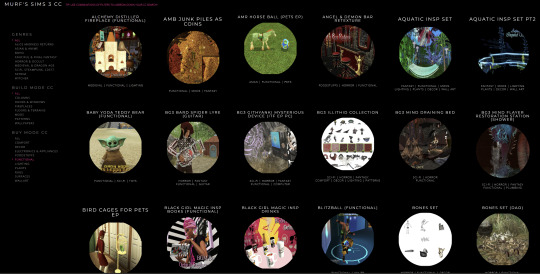
Quick Tid-Bits about Buy Mode CC Functionality
At its most basic level, object conversion follows the same basic steps from this tutorial I made here (for TS2 to TS3 converting). Once you have an .obj mesh and your .png/.dds textures, it's really just a matter of Exporting the mesh from a 3d modelling program (Blender or Milkshape), plus the textures into an image program (Gimp, Photoshop, etc), and Importing all of them into whichever TS3-compatible program you wanna work with (I always use TSRW cuz I can't stand Blender).
But when it comes to FUNCTIONAL CC, it really does depend on what the specific function is. Anything that's not Decor is Functional (anything sims can actually use/interact with; or that you can toggle specific options on). But the Buy Mode object types were NOT created equally--some are WAY more complex than others. Some functional objects are static--they don't move around much or do anything fancy (a table, a lamp, etc), and if they do move, it's very limited and doesn't require a bunch of finagling to make them work right. But some of these turds have pieces that are mobile/etc. 😰 When a sim interacts with the object, there's animations & bits moving all over the place & lights flashing & noises beeping & all kinds of crap happening. So objects tend to get more complicated to make as their functionality increases and there are a lot more moving parts.
LEVEL 1: SCRIPTED (Decor) Objects
Scripted objects are fun(ny), cuz that's when you're changing the base function of an object, by giving it a new Script in TSRW/S3PE (The Transmogrifier mod at MTS basically does this for you in-game). For ME, I'm usually turning a decor object into a functional one. Sometimes that's as simple as taking Wall Decor and giving it a script that makes it ACT like a functional wall tv/mirror/etc instead). Other times I'm making my Edible foodstuffs & Drinkable beverages. These often REQUIRE Arsil's Beverages Mod or something, cuz the script is from a 3rd party mod not built in the game itself. So it depends, but most of the time it's super easy & simple (which is why I tend to make these a lot 😅); just a matter of copy/pasting one script into another.
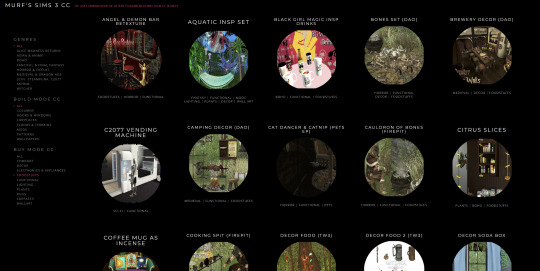
LEVEL 2: VERY simple functional static objects
There's some basic functional CC that follow the exact same steps as the 2t3 tutorial I already linked above--just swap the meshes & textures, adjusting the mesh sizes/positions as needed, and you're DONE (barring any finagling with Shaders (if you want the mesh to be see-thru or have a neon glow or whatever)):
Surfaces & Comfort (tables & chairs/sofas ONLY*)
Lighting (all lighting categories)
Electronics (Radios, Alarms, Clocks ONLY*)
Hobbies & Skills: LN pianos/keyboards
Toys (SN 8-ball, basegame/AMB crafted toys)
Plumbing (toilets, sinks, & SOME tubs)
Appliances (firepits)
Party (the dance rugs, SN fairy houses, FX Machines from LN/SHT ONLY*)
Debug/Transportation: Teleporter, IP Jet-skis
Plumbing (toilets, sinks, & SOME tubs)
* there's likely exceptions I'm forgetting about, but for the most part these are the "Only" super-reliably simple functional objects sims can use AFAIK
LEVEL 3: More involved functional objects
But then there's garbage that either require you to mess with their Joints/Bones (cuz the objects move / have animations when sims use them); or Geostates (the object changes shape/state when sims interact/use them & move them around). Or worse: you have to edit BOTH. 💀
More Involved (but not bad once you get the hang of it)
Electronics (TV screen meshes need careful positioning, computers have joints/bones on the mouse)
Appliances (stoves--the oven doors have joints/bones)
Storage (toy/treasure chests -- the lid has a joint/bone IIRC)
Sports (WA training dummies have joints/bones IIRC)
Debug (WA incense has geostates)
Hobbies & Skills (SN wands have geostates)
Transportation (ITF hover boards & SN magic brooms have geostates)
Toys (teddy bears have a lot more joints, that pretty much use similar steps as CAS CC--the Mesh Toolkit is your friend!)
None of these are really complicated, once you get the basics of how joints/bones & geostates work.
IMO, other than the teddy bear, you can easily & quickly assign joints/bones to meshes manually, without needing the Mesh Toolkit to do it for you at all. But be careful when manually assigning them! If you mess up assigning the joint/bones, the object mesh will move around in effed up ways during the animations.
OR, it might not move at all--which NGL is sometimes a blessing in disguise! 😅 Sometimes--not always!--it really doesn't matter if an object doesn't have bones/joints, esp. when converting super busy meshes that don't really "FIT" within TS3--like medieval/fantasy/sci-fi meshes with all kinds of fancy bits. In those cases, it's easier to say EFF the animations and just make it a static mesh instead--the dresser/chest/oven/etc doors/lids don't open, the car/bike wheels don't turn, but the object still FUNCTIONS properly--the sim can still USE it as intended, which is all that REALLY matters. 😌
Geostates though? That's a bit different. Cuz making geostates mean you have to make multiple different version of the mesh, cuz the object has different States that show up: full/empty, broken/fixed, up/down, messy/neat, finished/incomplete, on/off, open/closed states. Wands & guitars & brooms & beds & boats etc. NEED geostates in order to act right. They're either supposed to move around with the sim a certain way; or change depending what state they're in when interacted with versus left alone/idle. And those states can be freaking annoying to work with, esp. in TSRW. 🤦 Ofttimes it's easiest to break the mesh into multiple individual groups, Import them all into TSRW separately, and then manually assign the geostates group-by-group, not vertices-by-vertices--(guitars & rowboats, I'm looking at YOU).
LEVEL 4: Harder / More Complex (frikkin irritating)
Hobbies & Skills (guitars--too many effing geostates)
Toys (dollhouses, sandcastles, etc have geostates)
Storage (bookcases have geostates) dressers & armoire/wardrobes have annoying joints/bones for opening the drawers/doors/etc)
Pets (basegame fishbowls have a lot of geostates IIRC)
Transportation (IP rowboats have TOO MANY frikkin geostates & joints--I always say never again! and then I make another one, LOL 🤡🤥)
This is where my patience gets frikkin tested.
LEVEL 5: Too Effing Intimidating / Annoying / Hard For ME*
Appliances (pretty much everything else, I don't go here)
Comfort (beds, cribs, etc. have geostates I'm too lazy for)
Plumbing (showers/tubs with moving doors/screens)
Entertainment, Hobbies & Skills (I don't go here)
Transportation (bikes, cars--absolutely not)
Pets (my rabbit mod--never again and I mean it)
* I am notoriously LAZY--once there's one too many steps or things start acting funny or going wrong, I give up HELLA quick, cuz chile, I HATE making CC. Simming is a hobby that helps me relax; not a job I'm required to do for my livelihood--I'm not tryna be stressed over frikkin pixels. There's objects I've never made before; or only made ONCE and swore to NEVER make again cuz I love myself; or I've tried to make and completely failed at and don't care enough to figure out. So I'm not saying these objects are impossible, I'M just not messing with them. 🤣
TL;DR: Your Mileage May Vary!
So yeah, your question is actually harder to answer than it seems, cuz it really depends on what functional object you wanna convert. There's objects I have no idea how to make--I see way too many moving parts, and I run in the opposite direction.

25 notes
·
View notes
Note
how would u recommend a beginner get into blender? Ima 2D art student but want to fill out my portfolio and it looks super fun and cool!
Yay I'm so glad you want to learn Blender!
Since you're studying 2D, you probably have a lot to learn and practice already. So I'll try to answer in a way that could benefit you the most in both practices.
You probably already heard Blender has a tool called "grease pencil" - it's a 3d object, but they also built it so that if you want to do regular 2D illustration or animation, you can do that too.
Learning grease pencil first could be a good way to familiarize yourself with Blender's interface. And because a lot of the toolsets share how they operate (for instance, adding modifiers to the stack is the same no matter if you're using a grease pencil object, curve, or 3D mesh), you can more easily move to different parts of the program later, like poly modeling or sculpting.
One really great tutorial for 2D Blender is this one by Kevandram - https://www.youtube.com/watch?v=nZyB30-xZFs
From there you can move into tutorials that combine 3D and 2D - or just start with this if you're really excited to learn 3D modeling. Again Kevandram has a really great tutorial for that - https://www.youtube.com/watch?v=ftBFjGy5z08
Something you'll wanna watch out for with Blender tutorials is the version they're using. If your version of Blender is newer, then maybe a button or menu a tutorial tells you to use might have moved. Or some functionality may have changed. Luckily since Blender is open source, they make all versions available to you here: https://download.blender.org/release/
Once you get more familiar with Blender, jumping between versions is easier. But for the sake of learning, if you find a really great tutorial that's using an older version, you can just use that version. You can have multiple Blender versions installed - right now I have 4.4, 4.1, 4.0, and 2.79. So for instance in Kevandram's Bakery Shop tutorial, he's using Blender 3.0 which you can get here - https://download.blender.org/release/Blender3.0/
If you're not interested in grease pencil, or just want to jump straight to 3d, this is a great beginner modeling tutorial from SouthernShotty - https://www.youtube.com/watch?v=C1CFWDWTamo
It mostly sticks to modeling and then gets into basic material stuff. A simplified order to learn things in 3d would be:
Poly/mesh modeling
Modeling with curves
Adding materials/using the shader editor
Unwrapping 3d objects / learning the UV Editor
Texture painting / Painting texture maps (using that unwrapped map from 4) in Blender or some other program (Krita if you want to paint on the 2d map itself. Procreate if you want to paint directly on the model although that'll require a tablet).
A lot of beginner tutorials will take you through steps 1-3 usually, and maybe throw in some basic animation, camera setup, lighting, and rendering. More intermediate/advanced topics would be rigging, animating rigged models, physics simulations, and geometry nodes.
To bring it back to how this could benefit you the most as a 2d artist - something I see a lot of people do is prototype in 3d, and use that 3d render as a base to paint over. Some people strictly use grey boxes, and some people actually model/texture/light certain things and then render that out in layers to use in their painting program later. You can use as much or as little 3d as you want to help 2d painting.
Here's a couple videos showcasing that type of workflow: https://www.youtube.com/watch?v=CHIZtZ2JU3A https://www.youtube.com/watch?v=W5GSyytbABo https://www.youtube.com/watch?v=r5ZyW7K_yP8
Those use Blender's cameras and lights, which you'll pick up as you do modeling/texturing tutorials. Later you can get more advanced with those as well as the different rendering engines within Blender.
This was a lot, but I hope it helps clarify where you can start, and ultimately what you could get out of using 3d!
31 notes
·
View notes
Note
Hi great and powerful taldigi do you have any tricks for a beginning picking up 3D animation? Starting a filmmaking class soon and want that to be my main medium
download Blender it's a powerful, free, and open source software that has tons of user support and tutorials for everything under the sun. Skills you learn doodling in blender will give you a jump start on everything in the field. Steam also offers blender, which is helpful if you want to keep updated on it's own.
There are tons of resources: models, plugins, and shaders available. Everything under the sun. The program even has a built-in video editor.
look, i can make teddie tremble like a chihuahua who can comprehend the economy
The learning curve is sharp. But it's worth it. Pick something to try: model animation, rendering, texture work: and fiddle with it. there's no shame in making mistakes or asking questions. You aren't being graded or judged and starting as early as possible is the best way to go about it.
Practice makes perfect. Just do it. Or don't. idk man you do you.
#Anonymous#I am completely self taught#and I am no professional- what I do is hobby work.#been trying to convince a friend to just.. download the damn program and try it out for a few years now#and I'm sure they could have been a pro by now but idk apprehension is a hell of a drug
27 notes
·
View notes
Text
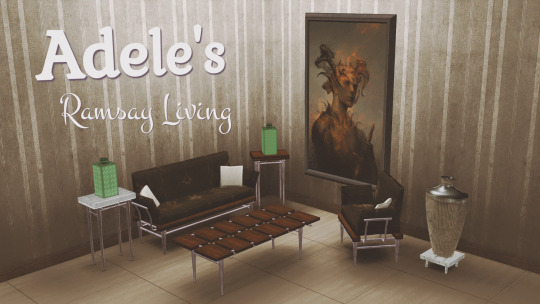
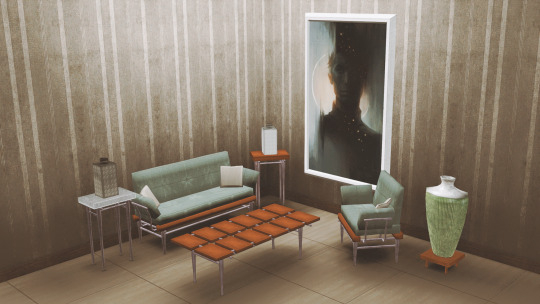
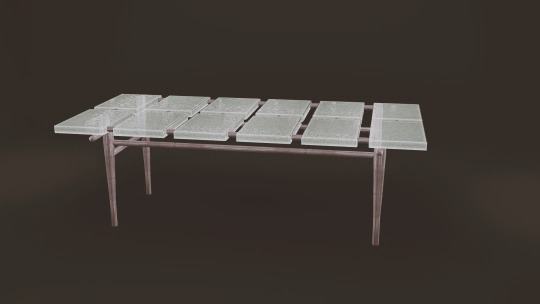
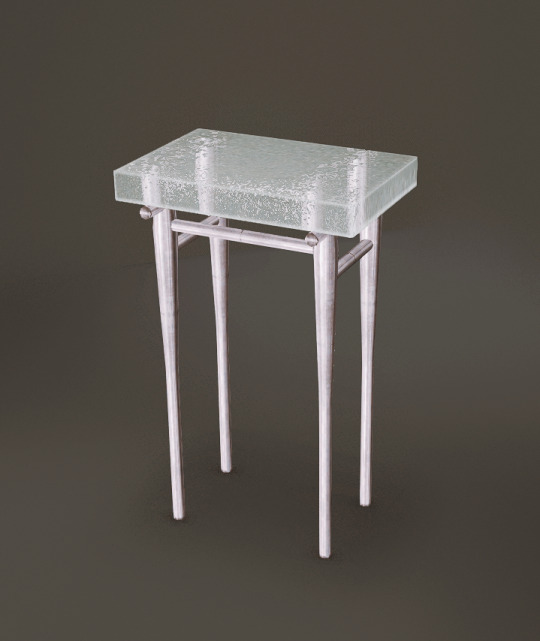
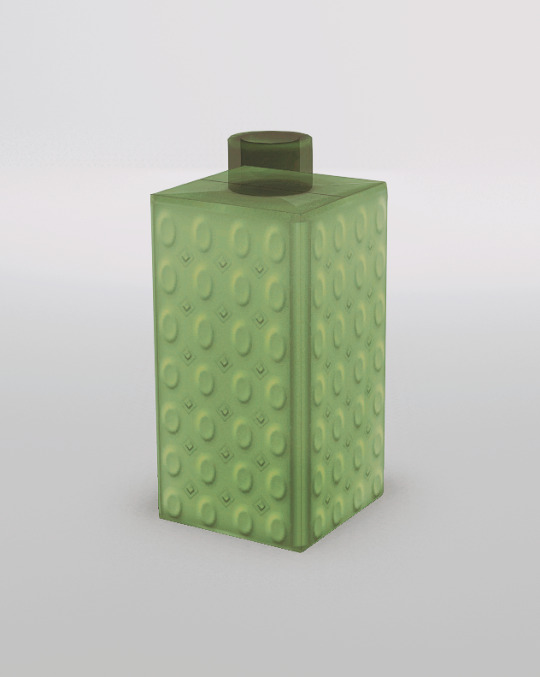


Adele's Ramsay Living for TS3
2 years ago, on a fateful evening, I decided to convert this set to TS3. Although this had already been converted, I had my reasons to do my own conversion. Long story short, there were things that I didn't like and things that I liked.
One thing that I liked in the previous conversion was the effort to make the table tops glass. So I experimented with the Basic Shower which is supposed to have frosted glass. I don't know why EA use horrible textures; when you replace the NormalMap with a proper frosted glass texture it looks amazing.
So, using this knowledge as a base, I worked on the frosted glass table tops and after countless failures, I finally managed to have the effect I wanted. The key is having the right values for UVSelector parameters in the shader.
I also changed the textures for the bottle; tried to recreate it as a multiplier. Then made another version. Bottles are semi-transparent glass and recolourable. Don't ask me how I made them - I don't remember. But I if have to guess, there is this tutorial that I know of. The first part is about recolourable glass.
I wasn't feeling Adele's art for the painting. So, I used the recolours made by @timeparadoxsims. The artist is @len-yan and the art is amazing. If any of them want me to remove the painting from my downloads, I will do so but cry inwardly. 😢
I know people hate reading and just want to download but THIS IS IMPORTANT: Several items share textures. So you need to have the 'masters' in your game for the 'slaves' to work. I will group them and explain further.
The Loveseat is the master for the following objects: Armchair, Sofa, End Table (Solid Top), Coffee Table (Solid Top).
Loveseat, Armchair, Sofa -> 4 Channels - 2 presets with second being Adele's black overlay & metal and wood parts still CAStable.
Loveseat Polycount -> HLOD: 1746 MLOD: 702
Armchair Polycount -> HLOD: 1578 MLOD: 726
Sofa Polycount -> HLOD: 1962 MLOD: 1096
End Table, Coffee Table -> 3 Channels - 1 Preset
End Table Polycount -> HLOD: 710 MLOD: 444
Coffee Table Polycount -> HLOD: 1322 MLOD: 720
The Cushions for Loveseat is the master for following objects: The Cushion for Armchair, The Cushions for Sofa.
All Cushions -> 1 channel, 3 different multipliers - 5 Presets with 2 of them being overlays. You don't need moveobjects on to place them on their appropriate seating. If you use alt to place the seating you need to use alt to place the cushions as well.
Loveseat & Sofa Cushions Polycount -> HLOD: 160 MLOD: 80
Armchair Cushions Polycount -> HLOD: 80 MLOD: 40
The Glass Top End Table is the master for The Glass Top Coffee Table.
Both tables have 1 Channel & 1 Preset. Polys are same as the solid tops.
Decorative Bottles
Both have 1 Channel & 1 Preset.
Polycount -> HLOD: 242 MLOD: 119
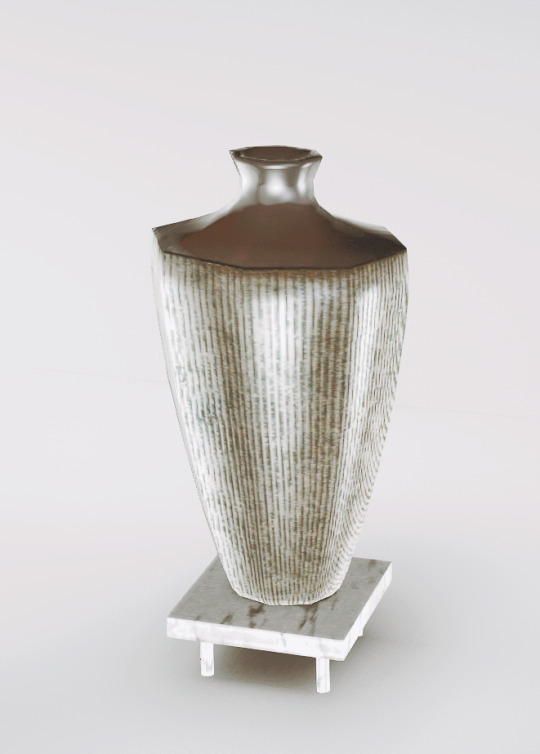
Decorative Vase
3 Channels - 2 Presets
Polycount -> HLOD: 446 MLOD: 344
Large Frame Painting
1 Channel - 18 Presets
Polycount -> HLOD: 82 MLOD: 64
I've also included the collection file which comes with its own icon for easy recognition. As always, I might have missed something; if you find anything weird don't hesitate to tell me so I can try and fix it. I hope you'll enjoy this beautiful set by talented Adele. Happy simming.
- Credits -
Adele for the meshes and textures.
@len-yan for the art.
@timeparadoxsims for the ts2 recolours
Google Fonts Montez, Kurale
Made with: SimPE, GIMP, s3oc, s3pe, Blender, Texture Tweaker 3, and TSRW
@pis3update @kpccfinds @xto3conversionsfinds

- DOWNLOAD -
:: MEDIAFIRE | SFS ::
125 notes
·
View notes